How to Build a Patio
A step-by-step overview of patio construction
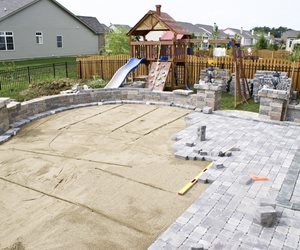
This picture shows the paving phase of patio construction in which pavers are being set in bedding sand.
Design and construction of a patio can range from a simple square in the backyard to an elaborate layout of paving amidst complex outdoor living spaces. It can be composed of a range of materials, but all of them are installed in the same basic way, with variations due to regional issues of climate, soil conditions and grading.
One of the most important parts of the design of a patio in colder climates where the ground freezes is the laying of a sub-base that must extend below the frost line to avoid freeze-thaw disturbance.
Devin Brunke of Arcadia Design Group of Centennial, Colorado details their layered approach to a patio using concrete pavers on expansive clay soils. "Installation of a patio depends on drainage. We have heavy clay soils that do not drain well. It is vital to have no pooling or bellies or depressions in the surface, and to do this you can't have too much base. Only limitations to depth are cost."
"We start by digging out the entire area to below the frost line. First we lay at least 4 to 8 inches of compacted subgrade. On top of that goes 4 to 8 inches of road base or recycled concrete packed and leveled. Above that is a thin setting bed of coarse concrete sand graded at 1/2 percent to 2 percent or more depending on site." Pavers, flagstone or a concrete slab all require this extensive underground layering to ensure they are all resistant to irregularities caused by expansion and contraction due to soils that freeze and thaw repeatedly.
Basic Step-by-Step Patio Construction
1. Prepare site.
Remove all existing plants, lawn and constructed elements down to the level of undisturbed soil. Excavate down to the depth dictated by the design plan for the project.
2. Compact subgrade.
This step ensures that the exposed soil is compacted to at least 95% or higher if the surface is to accommodate vehicular traffic. This is doubly important where the building pad is elevated or composed of cut and fill because there can be loose layers deeper down that can settle later on causing a depression in your paving. Special power equipment is necessary to achieve this compaction rate in heavy soils.
3. Lay geotextile.
This is special fabric designed to help prevent deep soil disturbance due to freeze-thaw or over saturation. It is not necessary on all projects, but provides greater insurance against unexpected changes in subgrade.
4. Spread base material.
The average residential project for pedestrian use is a 4 to 6 inch deep layer of gravel, but this can vary considerably from one project location to the next. Above this may be a two inch layer of coarse sand or very fine gravel that provides the setting bed for pavers.
5. Edge restraints.
These products made of flexible PVC are designed to hold the base material layer in place so it does not erode away and allow the outside pavers to tip. Staked into place, it is an essential product that provides the most cost effective way of keeping a patio as crisp as the day it was built. Some projects may require more elaborate concrete or edge paver installation.
6. Bedding sand.
This layer of concrete sand is spread no thicker than 1.5 inches. It is screeded to create a perfectly level base with just enough slope to ensure drainage on the surface.
7. Paving.
Pour a concrete slab, top with brick or sandstone. Set concrete pavers.
For information on installing various paving materials see:
8. Joint material.
Apply mortar or sand to fill joints in paving units.
9. Seal.
A penetrating acrylic sealer with a mat surface is recommended to keep paving color from fading and to prevent stains. It will require reapplication in the future to maintain the beauty of the paving, particularly in areas with snow, hard water or surfaces for vehicles.

 Backyards
 Front Yards


